Git is an indispensable version control system that helps developers manage their code efficiently. Visual Studio, a widely-used integrated development environment (IDE), provides built-in Git support, streamlining the process of working with version control. In this SEO-friendly article, we’ll walk you through how to use Git in Visual Studio, with a focus on Fetch, Push, Pull, and Sync operations.
Understanding Git Integration in Visual Studio
Visual Studio natively supports Git, allowing you to perform essential Git operations without leaving the IDE. This integration simplifies the process of managing your repositories, staging and committing changes, and working with branches.
What Does Git Mean?
Git, a distributed version control system, was created by Linus Torvalds, the creator of the Linux operating system. It enables developers to track changes in their codebase, work on multiple branches, and collaborate with others without overwriting each other’s work. The term “Git” doesn’t have a specific meaning – it’s simply a name chosen by Torvalds to represent the tool.
Configuring Git in Visual Studio
Before using Git in Visual Studio, ensure you have installed the Git for Windows package. Visual Studio will automatically detect the Git installation and use it for version control. To configure your Git user name and email address, go to:
mathematicaCopy codeTools > Options > Source Control > Git Global Settings
Enter your name and email address in the appropriate fields and click “OK.”
Fetching Changes from a Remote Repository
Fetching allows you to retrieve changes from a remote repository without merging or modifying your local branch. This operation is useful when you want to review the changes before merging or when you need to keep your local branch intact.
To fetch changes in Visual Studio, follow these steps:
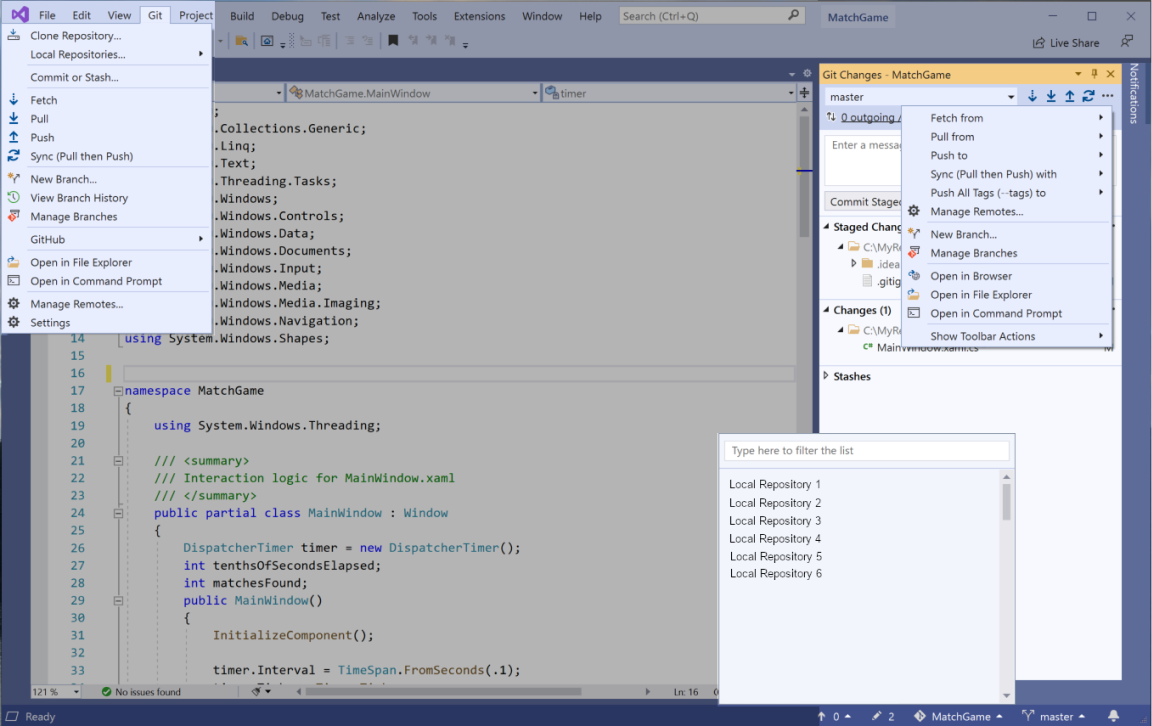
a. Open the “Team Explorer” window by going to:
sqlCopy codeView > Team Explorer
b. Click on the “Home” icon, then select “Sync.”
c. Under the “Incoming Commits” section, click “Fetch” to retrieve the remote changes.
Pulling Changes from a Remote Repository – Get Latest
Pulling is the process of fetching changes from a remote repository and merging them into your local branch. This operation updates your local branch with the latest changes from the remote repository.
To pull changes in Visual Studio, follow these steps:
a. Open the “Team Explorer” window.
b. Click on the “Home” icon, then select “Sync.”
c. Under the “Incoming Commits” section, click “Pull” to fetch and merge the remote changes into your local branch.
Pushing Changes to a Remote Repository – Send Your Code
Pushing is the process of sending your local changes to a remote repository. This operation updates the remote repository with the latest changes from your local branch. To push changes in Visual Studio, follow these steps:
a. Open the “Team Explorer” window.
b. Click on the “Home” icon, then select “Sync.”
c. Under the “Outgoing Commits” section, click “Push” to send your changes to the remote repository.
Syncing Changes (Pull then Push)
Syncing in Visual Studio is a combination of pulling and pushing changes. This operation fetches and merges changes from the remote repository into your local branch, then sends your local changes to the remote repository.
To sync changes in Visual Studio, follow these steps:
a. Open the “Team Explorer” window.
b. Click on the “Home” icon, then select “Sync.”
c. Click “Sync” under the “Incoming Commits” section to perform a pull, followed by a push.
Visual Studio’s Git integration simplifies version control for developers, allowing them to focus on coding while easily managing their repositories. By following these simple Git instructions in Visual Studio, you can become more efficient and utilize the tool to its fullest.